On an ARM board
Pre-requisites
- An ARM board with at least 512MB RAM
- A power supply (either an adapter or a MicroUSB cable) for your board;
- A microSD card: 16GB capacity (at least), class "A1" highly recommended (such as this SanDisk A1 card);
- A reasonable ISP, preferably with a good and unlimited upstream bandwidth
- An ethernet cable (RJ-45) to connect your server to your router.
- A computer to read this guide, flash the image and access your server.
Download the Armbian image
You should download the image Armbian Bookworm.
If you wish to check the validity of our signed images, you can download our public key.
Flash the Armbian image
Now that you downloaded the image of Armbian, you should flash it on a microSD card
- With Ether (recommended)
- With USBimager
- With dd
Download Etcher for your operating system and install it.
Plug your SD card, select your image and click "Flash"
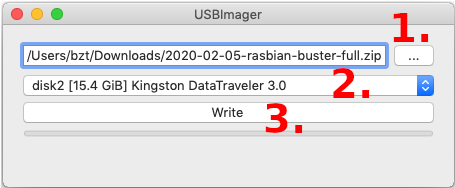
Download USBimager for your operating system and install it.
Plug your SD card, select your image and click "Write"
If you are on GNU/Linux / macOS and know your way around command line, you may also flash your USB stick or SD card with dd. You can identify which device corresponds to your USB stick or SD card with fdisk -l or lsblk. A typical SD card name is something like /dev/mmcblk0. BE CAREFUL and make sure you got the right name.
Then run:
# Replace /dev/mmcblk0 if the name of your device is different...
dd if=/path/to/armbian.img of=/dev/mmcblk0
Power up the board
- Plug the ethernet cable (one side on your main router, the other on your board).
- For advanced users willing to configure the board to connect to WiFi instead, see for example here (or here prior to YunoHost12/bookworm.
- Plug the SD card in your board
- (Optional) You can connect a screen+keyboard directly on your board if you want to troubleshoot the boot process or if you're more comfortable to "see what happens" or want a direct access to the board.
- Power up the board
- Wait a couple minutes while the board autoconfigure itself during the first boot
- Make sure that your computer (desktop/laptop) is connected to the same local network (i.e. same internet box) as your server.
Connect to the board
Next you need to find the local IP address of your server to connect as root user via SSH with the temporary password 1234.
ssh root@192.168.x.xxx
Run the install script
- Open a command line prompt on your server (either directly or through SSH)
- Make sure you are root (or type
sudo -ito become root) - Run the following command:
curl https://install.yunohost.org | bash
If curl is not installed on your system, you might need to install it with apt install curl.
Otherwise, if the command does not do anything, you might want to apt install ca-certificates
Note for advanced users concerned with the curl|bash approach: consider reading "Is curl|bash insecure?" on Sandstom's blog, and possibly this discussion on Hacker News.